The Easiest Fall Makeup Trend to Try This Season

Fall makeup does not have to mean a complicated smoky eye, three different contour products, and enough time in front of the mirror to make you question every life decision that brought you there.

This season, we’re keeping things warm, glowy, and ridiculously easy.

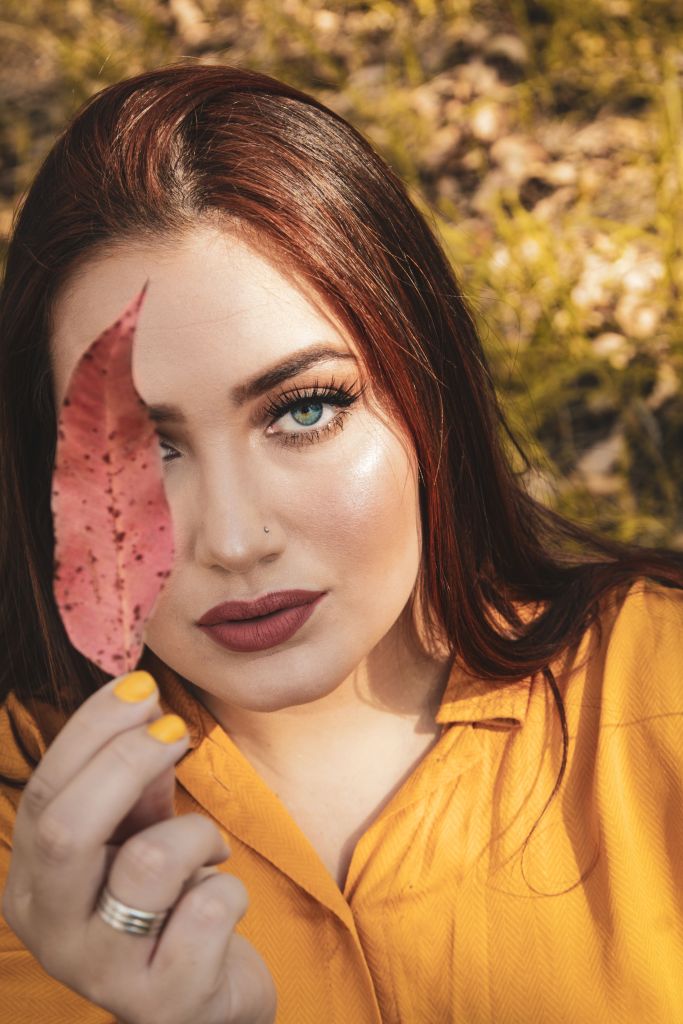
Think softly flushed cheeks, a little brown around the eyes, juicy lips, and skin that still looks like skin. Basically, you—but after a walk through a beautiful autumn afternoon.

And the best part? You can pull it off in minutes.

Start With Fresh Skin

Forget the heavy foundation.

For this look, the goal is a fresh, natural-looking base. Use a lightweight skin tint, tinted moisturizer, or just concealer where you actually need it.

Let a little skin show through.

The less-perfect finish is part of the point.

Add a touch of cream bronzer around your forehead, cheekbones, and nose for some warmth. Blend it out with your fingers or a makeup sponge. Don’t overthink it.

You are not sculpting a statue.

Bring on the Blush

This is where the fall feeling really kicks in.

Reach for a warm peach, terracotta, cinnamon, or rosy-brown blush. Cream formulas are especially easy because you can tap them on with your fingers and blend until everything looks soft.

Apply it to the apples of your cheeks and sweep a little toward your temples.

Want to make it even easier?

Use the same product on your cheeks and lightly across your nose.

Instantly: I just came back from a crisp fall walk.

Whether you actually went outside is between you and your conscience.

Brown Is Your New Best Friend

If black eyeliner feels a little too harsh for daytime, swap it for brown.

A soft brown pencil along the upper lash line gives your eyes definition without making you look like you’re preparing for a dramatic 8 p.m. entrance.

Smudge it with your fingertip.

That’s it.

You can also sweep a matte caramel, bronze, or warm brown shadow across your lids. No complicated blending. No ten-step eyeshadow tutorial.

Just one good wash of color.

Add mascara and you’re done.

The Lip Is the Main Event

Fall is when lipstick gets to have some fun.

Try a warm berry, brick red, cinnamon, rosy brown, or deep nude.

But here’s the trick: don’t make it too perfect.

Tap the color onto your lips with your finger instead of carefully drawing on a sharp edge. The result is softer, lived-in, and much easier to pull off.

If lipstick isn’t your thing, use a tinted balm in a warm berry or brownish shade.

Your lips, but significantly more interesting.

Add a Little Glow

Fall makeup doesn’t have to be matte from forehead to chin.

Tap a tiny amount of cream highlighter onto the tops of your cheekbones, the bridge of your nose, and your cupid’s bow.

Keep it subtle.

We’re going for lit from within, not “I can be seen from space.”

The Five-Minute Version

Running late?

Here’s your entire fall face:

  • Concealer where you need it.
  • Cream bronzer.
  • Warm blush.
  • Brown eyeliner or eyeshadow.
  • Mascara.
  • Tinted lip balm or berry lipstick.
  • A tiny bit of highlighter.

Done.

Go drink your coffee.

The Secret Is Not Trying Too Hard

The best thing about this fall makeup look is that it doesn’t require perfection.

A little smudged eyeliner? Great.

Blush that isn’t perfectly symmetrical? Nobody cares.

Lipstick that’s faded after your second coffee? That’s called living.

Fall makeup should feel warm, effortless, and a little bit undone.

So put away the complicated tutorials, grab your favorite warm-toned products, and give yourself five minutes.

A little blush. A little brown. A little berry.

That’s your fall face. And honestly? That’s plenty.

DID YOU ENJOY WHAT YOU JUST READ? IF YES, THEN SUBSCRIBE TO THE BLOG, GIVE THE POST A LIKE, OR LEAVE A COMMENT! NEW POSTS ARE UP EVERY TUESDAY & THURSDAY!

The Ultimate Fall Coffee Break: S’mores Cookie Bars

There are few things that say fall quite like s’mores.

Maybe it’s the nostalgia of sitting around a campfire, trying not to burn the marshmallow while simultaneously burning the marshmallow. Maybe it’s the combination of gooey chocolate, golden marshmallow, and crunchy graham crackers that somehow makes everything taste better.

Either way, you don’t need a campfire—or even a particularly chilly evening—to enjoy them.

These s’mores cookie bars bring all those cozy campfire flavors straight to your kitchen. They’re chewy and buttery, packed with chocolate and graham cracker crumbs, and topped with a layer of gooey toasted marshmallows.

Best of all, they’re exactly the kind of treat you want beside a hot cup of coffee during an afternoon fall break.

S’mores Cookie Bars

What You’ll Need

For the cookie bars:

  • 1 ½ cups all-purpose flour
  • 1 cup graham cracker crumbs
  • ½ teaspoon baking soda
  • ½ teaspoon salt
  • ¾ cup unsalted butter, softened
  • ¾ cup packed brown sugar
  • ¼ cup granulated sugar
  • 1 large egg
  • 2 teaspoons vanilla extract
  • 1 cup chocolate chips
  • ½ cup chopped chocolate or chocolate chunks

For the topping:

  • 2 cups mini marshmallows
  • ½ cup roughly crushed graham crackers
  • ¼ cup chocolate chips or chocolate chunks

Let’s Get Baking

Preheat your oven to 350°F and line a 9-by-13-inch baking pan with parchment paper. Leave a little overhang on the sides so you can easily lift the bars out later.

In a medium bowl, whisk together the flour, graham cracker crumbs, baking soda, and salt.

In a separate large bowl, beat the softened butter, brown sugar, and granulated sugar until light and creamy. Add the egg and vanilla and mix until everything is combined.

Gradually add the dry ingredients, mixing just until a dough forms. Fold in the chocolate chips and chocolate chunks.

Press the dough evenly into your prepared pan. Don’t worry if it looks a little thick—you’re building the foundation for some serious s’mores goodness.

Bake for 18–22 minutes, until the edges are golden and the center is just set.

Now comes the fun part.

Sprinkle the mini marshmallows evenly over the top, followed by the crushed graham crackers and extra chocolate.

Return the pan to the oven for another 3–5 minutes, until the marshmallows are puffy and beginning to turn golden.

If you want that true campfire-marshmallow look, switch your oven to broil for the last minute or so. Watch them very closely. Marshmallows can go from perfectly toasted to spectacularly burned in approximately three seconds.

Ask me how I know.

Let Them Cool

As tempting as it is to immediately cut into the pan, give the bars at least 20–30 minutes to cool.

This lets the chocolate set slightly and gives the cookie base time to firm up.

Then lift the bars out using the parchment paper and cut them into squares.

Don’t worry about making them perfectly neat. These are s’mores. A little mess is part of the charm.

Make It a Coffee Break

Now make yourself a proper cup of coffee.

A dark roast is especially good with the sweetness of the chocolate and marshmallow, but use whatever you love. Add cream, milk, cinnamon, or absolutely nothing.

Put one of those warm cookie bars on a plate.

And then—and this is important—actually take a break.

Step away from the computer. Put your phone down. Sit somewhere comfortable.

Take a sip of coffee.

Take a bite of cookie.

Enjoy the moment when the crunchy graham cracker meets the chewy cookie, melted chocolate, and gooey marshmallow.

Suddenly, your 15-minute afternoon coffee break feels suspiciously like a mini vacation.

A Few S’mores Upgrades

Want to take these over the top?

Try adding:

  • Peanut butter: Swirl a few spoonfuls into the cookie dough before baking.
  • Dark chocolate: Swap some of the milk or semisweet chocolate for dark chocolate.
  • Sea salt: Sprinkle a little flaky sea salt over the marshmallows when they come out of the oven.
  • Caramel: Drizzle the finished bars with caramel sauce.
  • Extra graham: Add another layer of graham cracker pieces right underneath the marshmallows for even more crunch.

Or keep them simple. Sometimes chocolate, graham crackers, and toasted marshmallows don’t need any help.

Your New Favorite Fall Treat

The best thing about these cookie bars is that they capture everything we love about s’mores without requiring anyone to find firewood, locate a long enough stick, or explain why their marshmallow is suddenly on fire.

They’re cozy, nostalgic, ridiculously gooey, and made for sharing.

Or, you know, keeping in the kitchen and mysteriously watching disappear one square at a time.

Either way, brew the coffee, grab a cookie bar, and enjoy a little taste of the campfire—no campfire required.

DID YOU ENJOY WHAT YOU JUST READ? IF YES, THEN SUBSCRIBE TO THE BLOG, GIVE THE POST A LIKE, OR LEAVE A COMMENT! NEW POSTS ARE UP EVERY TUESDAY & THURSDAY!

How to Freshen Up Your Wardrobe for Fall 2026

There’s something about fall fashion that makes me want to reinvent my entire personality. Suddenly I’m convinced I need a new wardrobe, a new pair of boots, and perhaps a completely different life.

The good news? You probably don’t need any of that.

Refreshing your wardrobe for fall 2026 is less about buying a closet full of new clothes and more about looking at what you already own with fresh eyes. A few smart additions, some creative layering, and a willingness to break out of your usual outfit formulas can make your wardrobe feel brand-new.

Start With a Closet Clean-Out

Before you buy anything, shop your own closet.

Pull out your fall clothes and actually look at them. What do you still love? What fits beautifully? What have you forgotten about? And, perhaps most importantly, what haven’t you worn in two years because you keep telling yourself you’ll “figure out how to style it”?

Now is the time.

Move the pieces you love to the front of your closet and put the things you never wear aside. You don’t necessarily have to get rid of everything—sometimes an item simply needs a little time away from your everyday wardrobe.

The goal is to make getting dressed easier and more fun.

Rethink Your Basics

One of the easiest ways to make old clothes feel new is to stop wearing them the same way.

That cardigan you’ve worn over the same jeans for five years? Button it up and wear it as a top.

Your favorite summer dress? Layer it over a long-sleeved shirt or thin turtleneck.

A button-down shirt can go under a sweater, over a tank, or underneath a jacket.

And don’t underestimate the power of simply changing your proportions. Try a cropped jacket with a longer skirt, an oversized sweater with slim pants, or wide-leg trousers with a fitted top.

Sometimes you don’t need new clothes. You need new outfit combinations.

Invest in One Really Good Jacket

If you’re going to buy one new piece for fall, make it something you’ll wear constantly.

A great jacket can completely transform an outfit. Look for something that works with jeans, trousers, dresses, and skirts—a jacket you can throw on when you’re running out the door and somehow look like you planned the whole outfit.

Depending on your style, that could mean a classic trench, a leather jacket, a barn jacket, a tailored blazer, a bomber, or a cozy wool coat.

The key is versatility.

You want the jacket that makes you think, Oh, this works with everything.

Add a Little Color

Fall wardrobes have a tendency to become very serious.

Black. Gray. Brown. Beige. More beige.

While there is absolutely nothing wrong with a beautiful neutral wardrobe, adding one unexpected color can make everything feel more interesting.

Try burgundy with denim. Deep green with cream. Red with camel. Cobalt blue with chocolate brown.

And if you’re not ready to commit to a brightly colored coat, start small. A handbag, scarf, shoes, sweater, or even a pair of earrings can give an otherwise neutral outfit some personality.

Think of it as giving your wardrobe a little caffeine.

Bring Out the Accessories

Accessories are the easiest—and often cheapest—way to make your wardrobe feel different.

Try adding a belt to a dress or oversized blazer. Tie a scarf around your neck or onto your handbag. Layer necklaces over a simple sweater. Add a statement brooch to a jacket.

And don’t be afraid to wear the “special” accessories you’ve been saving.

There is no special occasion coming.

You are the occasion.

Make Denim More Interesting

If your daily uniform is jeans and a sweater, don’t abandon it. Just give it a twist.

Try a different silhouette. Cuff your jeans. Wear them with a dressier shoe. Add a belt. Swap your usual sweater for a crisp button-down and jacket.

You can also experiment with denim skirts, wide-leg jeans, cropped styles, or vintage-inspired pairs.

The trick is to change one element of your familiar outfit rather than reinventing everything at once.

Mix High and Low

Fall is the perfect season for mixing things up.

Wear your nicest blazer with an old pair of jeans. Pair a vintage skirt with a basic T-shirt. Wear an inexpensive sweater with beautiful jewelry.

An outfit doesn’t have to

DID YOU ENJOY WHAT YOU JUST READ? IF YES, THEN SUBSCRIBE TO THE BLOG, GIVE THE POST A LIKE, OR LEAVE A COMMENT! NEW POSTS ARE UP EVERY TUESDAY & THURSDAY!
Glow Getter Salad 🥕✨

Want to put a little more glow on your plate? This colorful salad is loaded with vitamin A–rich foods like sweet potato, carrots, and leafy greens. It’s crunchy, creamy, colorful—and basically the edible equivalent of a good skincare day.

🥗 What You’ll Need

  • 2 cups baby spinach or kale
  • 1 small roasted sweet potato, cubed
  • 1 shredded carrot
  • 1/2 avocado, sliced
  • 2 tablespoons pumpkin seeds
  • 1/4 cup chickpeas
  • 2 tablespoons crumbled feta
  • Optional: a handful of fresh herbs

🍋 Easy Glow Dressing

Whisk together:

  • 2 tablespoons olive oil
  • 1 tablespoon fresh lemon juice
  • 1 teaspoon honey
  • 1/2 teaspoon Dijon mustard
  • Pinch of salt and pepper

✨ Toss, Crunch & Glow

Pile your greens into a bowl and add the roasted sweet potato, carrot, avocado, chickpeas, feta, and pumpkin seeds. Drizzle with your dressing, give everything a good toss, and admire your masterpiece.

The colorful ingredients aren’t just pretty—they provide provitamin A carotenoids, which your body can convert to vitamin A. Vitamin A plays important roles in normal skin health, along with vision and immune function.

Pro tip: Vitamin A carotenoids are fat-soluble, so pairing colorful vegetables with healthy fats like olive oil and avocado is a tasty way to help your body absorb them.

Eat your rainbow, grab your fork, and let your lunch do a little of the glowing.

DID YOU ENJOY WHAT YOU JUST READ? IF YES, THEN SUBSCRIBE TO THE BLOG, GIVE THE POST A LIKE, OR LEAVE A COMMENT! NEW POSTS ARE UP EVERY TUESDAY & THURSDAY!
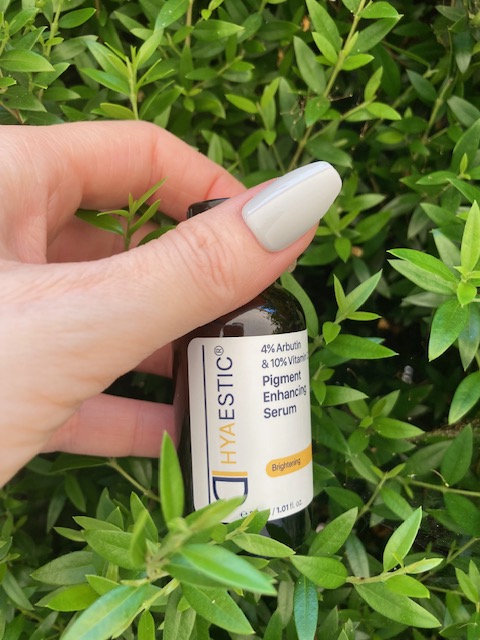
Review: Hyaestic – Pigment Enhancing Serum 4% Arbutin & 10% Vitamin C

What It Is: This is a corrective serum that targets various skin concerns from brightening to discoloration, fine lines, and overall texture.

What It Does: This serum helps brighten your skin, supports collagen turnover, firms skin, pigment correction, and improves skin’s radiance.

Active Ingredients: 4% Arbutin, 10% Vitamin C

Verdict: This serum has a lightweight, non-sticky texture that absorbs quickly into the skin. I have combination-to-oily skin, so I’m always wary of serums that leave behind a greasy or heavy residue. Thankfully, this one absorbed quickly without making my skin feel oily or sticky, and it layered easily under moisturizer.

I used it consistently for two weeks and started noticing visible improvements within the first five days. One of my biggest concerns is enlarged pores, which are especially noticeable with my oily skin, and this serum helped make them look smaller and less pronounced. I also had some lingering discoloration from a previous blemish on my cheek, and that began to fade quickly. Within about a week, my complexion looked more even, radiant, and refreshed.

Because my skin is also prone to blemishes, I usually find heavier creams and serums too much for my skin. This formula, however, feels incredibly light and is a great option if you struggle with oiliness, enlarged pores, or blemish-prone skin.

The serum is also marketed as helping with fine lines, but I can’t personally speak to that benefit since I don’t have any significant fine lines to assess. Based on how well it addressed my other skin concerns, though, I could see it being a worthwhile option for those with more mature skin.

Overall, I was impressed with this serum. It has a lightweight feel, layers beautifully, and delivers noticeable results in as little as a week with once-daily use. If pigmentation is your main concern, I think using it twice a day could be more beneficial, as long as your skin tolerates it well. For anyone looking for a serum that tackles multiple concerns without feeling heavy or greasy, this one is definitely worth considering.

Price: $70.00

Where To Buy It: https://hyaestic.com/

*Thank you so much to Hyaestic for a free sample of the product for an honest review.

Radiant skin after two weeks of Hyaestic Serum!

DID YOU ENJOY WHAT YOU JUST READ? IF YES, THEN SUBSCRIBE TO THE BLOG, GIVE THE POST A LIKE, OR LEAVE A COMMENT! NEW POSTS ARE UP EVERY TUESDAY & THURSDAY!
Eat Your Way to Amazing Skin: Foods Your Face Will Love

Glowing skin doesn’t start and end with your skincare routine. Sometimes, the best beauty boost is sitting right on your plate. ✨

Here are a few tasty foods that can help support healthy, happy-looking skin:

🥑 Avocados: Your Skin’s Bestie

Packed with healthy fats and vitamin E, avocados help support your skin’s natural barrier and keep it looking soft and supple. Guacamole suddenly counts as self-care.

🫐 Berries: Tiny but Mighty

Blueberries, strawberries, and raspberries are loaded with antioxidants, which help protect your cells from oxidative stress. Toss them into yogurt, oatmeal, or smoothies for an easy glow-up.

🐟 Fatty Fish: Glow From the Inside

Salmon, sardines, and mackerel are rich in omega-3 fatty acids. These healthy fats support the skin barrier and help keep skin looking calm and hydrated.

🥕 Carrots & Sweet Potatoes: Orange Is the New Glow

These colorful veggies are rich in beta-carotene, which your body can convert into vitamin A. Add them roasted, mashed, or tossed into a salad.

🥜 Nuts & Seeds: Small Snacks, Big Benefits

Almonds, walnuts, sunflower seeds, and chia seeds provide healthy fats, vitamin E, and other nutrients your skin needs. Keep a handful nearby for an easy snack.

💧 And Don’t Forget Water

No fancy ingredient required. Staying hydrated supports your overall health, including your skin. Keep a water bottle nearby and sip throughout the day.

The Bottom Line

There’s no single “magic” food for perfect skin. The real secret is variety: eat plenty of colorful fruits and vegetables, choose healthy fats and protein, and stay hydrated. Your skin—and the rest of your body—will thank you. 🌟

DID YOU ENJOY WHAT YOU JUST READ? IF YES, THEN SUBSCRIBE TO THE BLOG, GIVE THE POST A LIKE, OR LEAVE A COMMENT! NEW POSTS ARE UP EVERY TUESDAY & THURSDAY!

Sunshine Sips: A Zingy DIY Energy Shot

Need a little get-up-and-go without reaching for another giant cup of coffee? This bright, zippy energy shot is small, refreshing, and packed with bold citrus flavor. Think of it as a tiny glass of sunshine for your morning!

🍋 Citrus-Ginger Energy Shot

Makes: 2 small shots
Prep time: 5 minutes

Ingredients

  • 1/2 cup fresh orange juice
  • 2 tablespoons fresh lemon juice
  • 1-inch piece fresh ginger, peeled
  • 1/2 teaspoon honey or maple syrup
  • Pinch of cinnamon
  • Optional: a few fresh mint leaves

Blend It Up

Add everything to a blender and blend until smooth. If you prefer a silky-smooth shot, strain the mixture through a fine-mesh strainer.

Pour into two small glasses, take a sip, and let the citrusy zing wake up your taste buds.

Make It Your Own

Want more zing? Add extra ginger. Prefer it sweeter? Add another drizzle of honey. For a fun summer twist, chill the mixture and serve it over ice as a mini citrus refresher instead of a shot.

The vibe: bright, tangy, spicy, and refreshing—with just enough ginger kick to make your morning feel a little more exciting.

Note: This recipe doesn’t contain caffeine, so think of it as a refreshing pick-me-up rather than a stimulant-based energy drink.

DID YOU ENJOY WHAT YOU JUST READ? IF YES, THEN SUBSCRIBE TO THE BLOG, GIVE THE POST A LIKE, OR LEAVE A COMMENT! NEW POSTS ARE UP EVERY TUESDAY & THURSDAY!

Bronzed & Glowy: Your Guide to the Perfect Summer Look

There’s just something about summer that makes us want to look like we’ve spent the day lounging by the pool—even if we’ve actually spent eight hours answering emails. Enter bronzer, your shortcut to that warm, sun-kissed glow without requiring a beach vacation.

The secret? Don’t think of bronzer as something you use to completely change your complexion. Think of it as adding a little summer magic exactly where the sun would naturally hit.

Start With a Fresh Base

Before reaching for your bronzer, keep your base light and fresh. A tinted moisturizer, skin tint, or lightweight foundation is perfect for summer. You want your skin to still look like skin.

Add a little concealer where you need it, blend everything well, and let your natural glow do some of the work.

Follow the Sun

Now for the fun part!

Using a fluffy brush, lightly sweep bronzer across the areas where the sun naturally kisses your face:

  • Across the tops of your cheekbones
  • Along your forehead near the hairline
  • Across the bridge of your nose
  • A little along your jawline

Think I spent the afternoon outside”, not I painted a stripe on my face.” Start with a small amount and build the color gradually. It’s much easier to add more than it is to undo an enthusiastic bronzer situation.

Don’t Forget Your Cheeks

For an extra summery look, bring your bronzer slightly onto your cheeks before adding blush. Then pop a peachy, coral, or rosy blush right on top.

The combination of warm bronzer + fresh blush gives you that just-back-from-the-beach look—even if the closest you’ve been to the ocean is watching beach videos on TikTok.

Add a Little Glow

Summer is the perfect excuse to embrace a little shimmer. Tap a subtle highlighter onto the tops of your cheekbones, the bridge of your nose, and just above your cupid’s bow.

Keep it soft. You want sunlight catching my skin,” not I am personally responsible for reflecting sunlight into passing airplanes.”

Take It to the Rest of You

If your face is bronzed and your shoulders are noticeably not, things can get a little suspicious.

For special occasions, lightly dust bronzer or body glow across your collarbones and shoulders to create a more seamless look. Just make sure your formula is designed for the body if you’re applying it over a larger area.

The Final Summer Touches

Finish your look with fluffy brows, a swipe of mascara, and a juicy lip gloss or tinted balm. If you want to go all-in on the summer vibe, try a warm peachy or coral lip.

And there you have it: glowy, bronzed, and ready for summer.

The best part about bronzer is that there really are no hard rules. Want more glow? Go for it. Prefer a matte finish? Gorgeous. Want to look like you just returned from a week in the Mediterranean when you actually spent the weekend at home? Bronzer understands the assignment.

Just remember: blend, build, and have fun. Summer makeup should feel less like a complicated routine and more like an excuse to glow a little brighter.

DID YOU ENJOY WHAT YOU JUST READ? IF YES, THEN SUBSCRIBE TO THE BLOG, GIVE THE POST A LIKE, OR LEAVE A COMMENT! NEW POSTS ARE UP EVERY TUESDAY & THURSDAY!

Book Review: Marla by Jonathan Janz

PLOT SUMMARY:

Every small town has ghosts. King’s Branch has Marla.

A reclusive young woman who lives with her mother in a creepy Gothic house, Marla Gorman is the stuff of urban legends. Some believe she’s a prisoner. Others claim she’s a witch.

The evening of the first murder, Detective Carl Lancaster sees Marla leering at him from her bedroom window. He sees her again at the exact moment a second man is killed. And though Marla was nowhere near either murder site, Carl is convinced she’s connected to the crimes.

To Carl, Marla is a menace. To social worker Annie Frost, Marla bears a bizarre connection to her past. To Dylan Ellison, a struggling college student, Marla might be the companion for whom he’s been longing.

But none of them understands Marla’s true nature. She’s about to plunge them—and everyone in King’s Branch—into an unspeakable nightmare and teach them the true meaning of terror.

GRADE: A-

REVIEW:

Strange deaths begin to plague the small town of King’s Branch, and Detective Carl Lancaster finds himself at a loss. He can’t figure out what—or who—is behind the growing body count. One thing keeps nagging at him: every time someone dies, Marla seems to be somewhere in the periphery. The problem? Carl can’t prove a thing.

Marla is a recluse who lives in an old, unsettling house with her mother, Irene. The townspeople have always been wary of the two women, but as the deaths pile up, Carl finds himself drawn back to their doorstep again and again. The closer he gets to the truth, the more disturbing the mystery becomes.

Marla was a fascinating, deeply creepy read, filled with just the right amount of small-town lore and dark secrets. Fans of Stephen King will feel right at home, especially those who enjoy stories where an entire town seems to be hiding something.

The audiobook was especially well done. The two narrators brought an added layer of tension and unease to the story, making the already creepy atmosphere even more unsettling.

Highly recommended for anyone who loved Carrie but wished she were even creepier.

*Thank you so much to NetGalley & Blackstone Publishing for the audiobook copy of this book in exchange for an honest review!

DID YOU ENJOY WHAT YOU JUST READ? IF YES, THEN SUBSCRIBE TO THE BLOG, GIVE THE POST A LIKE, OR LEAVE A COMMENT! NEW POSTS ARE UP EVERY TUESDAY & THURSDAY!
Book Review: Grief Eater by Emma Osborne

PLOT SUMMARY:

When Kristina rises from her violent death, she’s not the same fragile woman her family once abandoned. She’s rageful, powerful, and hungry—for the blood of the ones who were supposed to love her. With a newfound craving to see vengeance and grief served, she launches into a once-in-an-undead-lifetime journey across blood-slicked highways to the scorched Australian bush and her hometown. As her body fails and her mind fractures, she’s left with one final question: Is she here to forgive, or to feed?

GRADE: A

REVIEW:

I’m usually not a big fan of zombies in books, but Grief Eater by Emma Osborne tells a very different kind of story. Sure, there are infections, gore, and plenty of human flesh-eating, but at its heart, this is an emotional journey through sorrow, anger, and, yes, grief.

When Kristina wakes up transformed, she’s filled with rage and an overwhelming hunger for human flesh. Instead of simply accepting her monstrous new state, though, she decides to use it to get revenge on the family who wronged her. As she sets out on this dark journey, we learn more about her past—including her friendship with her best friend and the love she once had but ultimately gave up because she was too afraid to come out at the time.

What follows is an emotional reckoning that gives the story far more depth than your typical gory zombie tale. There’s plenty of gore for horror fans, but beneath it all is a story about love, loss, identity, and the weight of unresolved grief.

Highly recommend this one for horror readers who like their books with a little more heart beneath the blood and guts.

*Thank you so much to NetGalley & Interstellar Flight Press for the ebook copy of this book in exchange for an honest review!

DID YOU ENJOY WHAT YOU JUST READ? IF YES, THEN SUBSCRIBE TO THE BLOG, GIVE THE POST A LIKE, OR LEAVE A COMMENT! NEW POSTS ARE UP EVERY TUESDAY & THURSDAY!