Makeup Muse: Elle Fanning

elle

To shake things up I decided to do my first collab with the awesome Brooke (brookeclarke.com, go check her blog out, it’s seriously tops!). We both agreed to do our take on Elle Fanning’s effortless Cannes 2017 makeup look!

One thing that Elle always has is beautiful skin, so for this look you’re going to want to prep your skin with some hydrating cream and primer. Some of my favourite light day creams are The Body Shop Seaweed Oil Control Day Cream ($20) or Clinique Superdefense Daily Dense Moisturizer Broad Spectrum SPF 20 ($48), these creams are perfect for acne-prone or oily to combination skin types. If you’re more on the dry side, you’re better off choosing a richer cream.

For this look, the focus was on the lips whilst the eyes were almost left bare (almost meaning that they chose natural looking colours rather than something bold). And while the lips were supposed to be the main attraction, the look was softened by a rose/blush hue.

I attempted to recreate the look whilst putting my own spin on it so this is more of an inspiration than exact photocopy.

IMG_0342

IMG_0344

IMG_0345

Products* Used:

Clinique Pep-Start Hydroblur Moisturizer

Urban Decay ABC Gum Eyeshadow (on lid)

Urban Decay Anaheim Eyeshadow (as liner)

Lancome Color Design Eyeshadow in Chic (in crease)

Wet N’ Wild Eyeshadow in Creme Brullee (on brow bone)

Medusa’s Makeup Brow! Wow! Wow!

Urban Decay Star Bronzer Natural Glow

Lancome Le Crayon Khol in Blanc (in waterline)

Soap & Glory One Heck of a Blot Translucent Powder

Lancome Long-Lasting Undereye Concealer in Ivoire

Urban Decay Afterglow Powder Blush in Score

Jeffree Star Cosmetics Skin Frost in Peach Goddess

Jeffree Star Cosmetics Velour Liquid Lipstick in Rosematter

It Superhero Mascara

This is a fairly easy makeup look that can be recreated in 20-mins! Perfect for days when you’re running late or don’t feel like having too many products on your face!

IMG_0348

IMG_0358

*All products used were purchased by writer.

By: Azzurra Nox

Violent Violet Make-up Look!

Nowadays, it’s far more common that I’ll be sporting a neutral smokey look when it comes to eye-makeup. But when I was just a teenager, I LOVED bold purple shadows. I think one of the reasons why I stopped doing my eyes that way wasn’t because I didn’t enjoy the purple shadows anymore, but rather because in the coming years it has been difficult to find shades of violet that I actually like and suit me.

But recently I’ve found a violet shadow that I adore, and decided to start sporting the same makeup look I had when I was sixteen to see if I’d still love it today. Well, I probably wouldn’t wear it everyday now, but I do think it’s a pretty option every now and then.

violet3

Products*:

Notoriously Morbid Eyeshadow – Siren Song

Wet N’ Wild Eyeshadow – Creme Brullee

Urban Decay Eyeshadow – Anaheim

Urban Decay Eyeshadow – Romp

Urban Decay Eyeshadow – Blonde

L’Oreal Mascara Primer

L’Oreal Voluminous Mascara in Blackest Black

NYX Eyebrow Marker in Medium

Jeffree Star Liquid Lip Velour in Rose Matter

Urban Decay Glow Blush in Score

Smashbox Full Exposure Mascara in Black

Lancome Le Crayon Khol in Blanc

violet

Step One:

I distributed Notoriously Morbid’s loose shadow in Siren Song all over my lid. I really packed on the colour. Be sure to use an eyeshadow primer as that truly makes the colour POP. Usually I use Urban Decay’s Primer Potion, but I decided to get Wet n’ Wild eyeshadow primer a go and it works just as well at a fraction of the price!

Step Two:

To not overwhelm the purple, it’s best to use a neutral transition colour on the crease. I opted for Urban Decay’s Anaheim shade. I dusted it with a light hand using a blending brush. I then placed Wet N’ Wild’s Creme Brullee shade all over my brow bone and lightly dusted Urban Decay’s Blonde shade on my brow bone to highlight it.

Step Three:

I then used Urban Decay’s Romp shade (a deep purple) as my liner for upper and lower lashes. It’s an eyeshadow, but I often like to use shadows as liner when I’m trying to keep the look light and not product heavy. I then used Lancome’s Le Crayon Khol in Blanc on the inside of my lower lash line.

violet2

Step Four:

After curling my lashes with an eyelash curler, I used L’Oreal’s Primer to coat my lashes. I allowed ten seconds to dry before applying three coats of L’Oreal’s Voluminous Mascara in Blackest Black and one coat of Smashbox’s Full Exposure Mascara to my lower lashes. For my brows I used NYX’s Eyebrow Marker in Medium. This is hands-down the best and most lightweight eyebrow I’ve ever used! So kudos to NYX for making such a kick-ass product that is long-lasting and smudge free!

Step Five:

To complete the look I dusted Urban Decay’s Glow blush in Score and added Jeffree Star’s Liquid Velour Lipstick in Rose Matter to my lips.

lips

Now slip into something edgy and go out to show off your look! Let me know what your fave purple shadows are in the comments below!

*All products used for this look were purchased by the writer.

By: Azzurra Nox

Simple Spring Makeup Look!

Glamorous looks are gorgeous, but not always doable when you haven’t got lots of time to spend hours applying makeup. I usually prefer to use less products as possible and try to keep my look simple but never drab!

These are the products* I used to achieve this look. You don’t have to use the same products as me, and can opt similar looking ones, but these are the ones I reached for to create the look below:

Products:

Smashbox Photo Finish Foundation Primer

Maybelline Instant Age Rewind Eraser Dark Circles in Light

LunatiCK Cosmetic Labs High Definition Microfinish Pressed Powder

Urban Decay Eyeshadow Primer Potion Original

Revlon Colorstay Liquid Eye Pen Classic in Blackest Black

L’Oreal Voluminous Superstar in Blackest Black

From Lancome’s Auda[city] in Paris Palette:

Exhibition Eyeshadow (on lid)

Kitten Heel Eyeshadow (on lid)

Smashbox Matte Eyeshadow:

Grounded (in crease)

Canyon (along lower lash line & brows)

Urban Decay Eyeshadow in Skimp (on brow bone)

Lancome Le Crayon Khol in Blanc

Jeffree Star Velour Liquid Lipstick in I’m Shook

Urban Decay Afterglow Powder Blush in Score

eyeeye2

Step One:

Use Smashbox’s Photo Finish Foundation Primer below your eyes, as a way to create a smooth surface for your concealer to go on (this helps eliminate creases!). I’m somewhat picky when it comes to concealers and always opt for liquid formulas over sticks. I placed Maybelline’s Instant Age Rewind Eraser Dark Circles in Light beneath my eyes to conceal my dark circles and use a beauty blender to blend it out. I then set the concealer using LunatiCK’s. Cosmetic Labs High Definition Microfinish Pressed Powder.

Step Two:

Swipe Urban Decay’s Eyeshadow Primer Potion Original upon your lid (or any other eyeshadow primer that you prefer). This will help lock in the eyeshadow that you’re going to be placing on top, as well as having the shadow not face throughout the day.
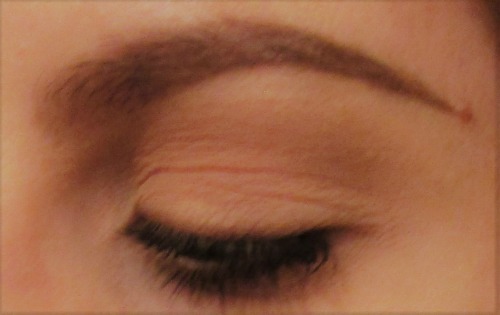
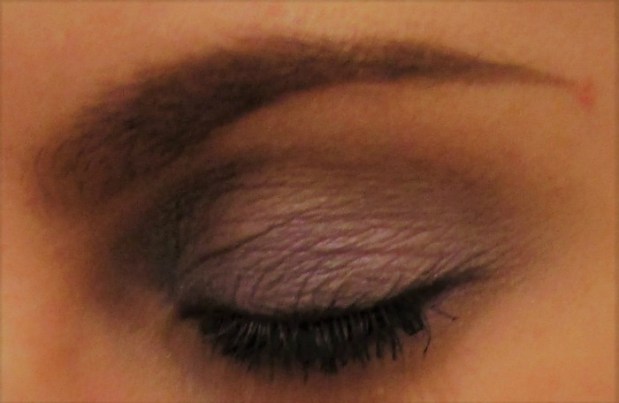
Step Three:

Swipe Lancome’s Eyeshadow in Exhibition on the lid. This is a matte pink and will help keep the look from getting too sparkly. Then place Lancome’s Eyeshadow in Kitten Heel on top, and blend the two colors till the matte pink and frosty peach become a pretty muted pink hue.

Step Four:

Using a blending brush, place Smashbox’s Matte Eyeshadow in Grounded in your crease and blend, blend, blend!
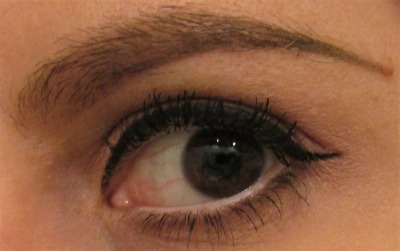
Step Five:

Line your lower lashes using Smashbox’s Matte Eyeshadow in Canyon. I often find that using a pencil liner for the lower lashes to be too harsh and accentuates fine lines. A shadow liner is far more forgiving in that respect.
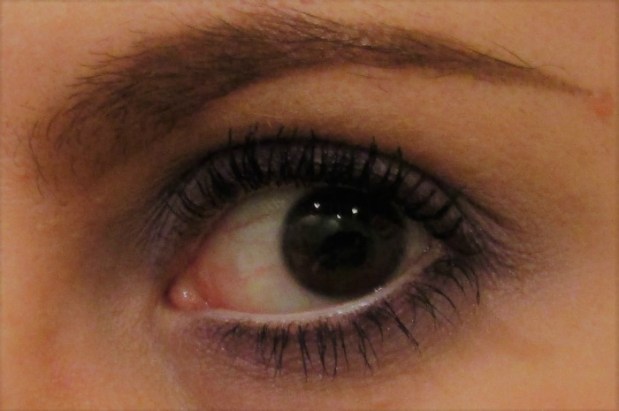
Step Six:

Line your upper lid using Revlon Colorstay Liquid Eye Pen Classic in Blackest Black. You can either do a simple liner look or cat-eye at this point, whatever strikes your fancy! I find that Revlon’s liner is one of the best for being fool-proof and cost-effective.

Step Seven:

Using a slanted brush, take Smashbox’s Matte Eyeshadow in Canyon to fill your brows (if you’re light haired as myself), if not choose an eyeshadow that best suits your hair color.

Step Eight:

Take Urban Decay’s Eyeshadow in Skimp and place it upon your brow bone. This shade is slightly satin so it gives a bit of a sheen like a highlighter. Then use Lancome’s Le Crayon Khol in Blanc to line the inside of your lower lash so that your eye appears bigger rather than smaller (as it would using a black liner).

Step Nine:

Take a lash curler and carefully curl your lashes. Then take L’Oreal’s Voluminous Superstar in Blackest Black, and first use the mascara primer portion of the wand and let it sit for about 15 seconds. Then using the mascara portion of the wand apply two coats of mascara, and a light coat on your lower lahes. The reason why I love this mascara so much is because you get two products for the price of one (primer & mascara)!
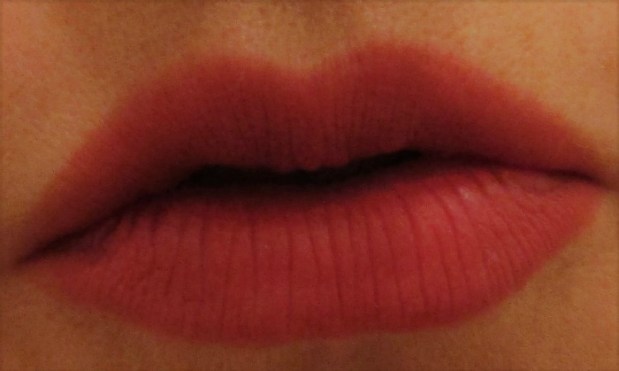
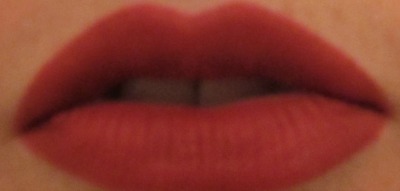
Step Ten:

Lightly line your lips using Lancome’s Le Crayon Khol in Blanc and rub it still the line is barely visible. Use the line to help guide you as your apply Jeffree Star’s Velour Liquid Lipstick in I’m Shook. Tip: Use a THIN coat when applying a liquid lipstick as a thicker coat will weigh down your look and appear too made up. Finish the look by applying a light dusting of Urban Decay’s Afterglow Powder Blush in Score on the apple of your cheeks!

lips

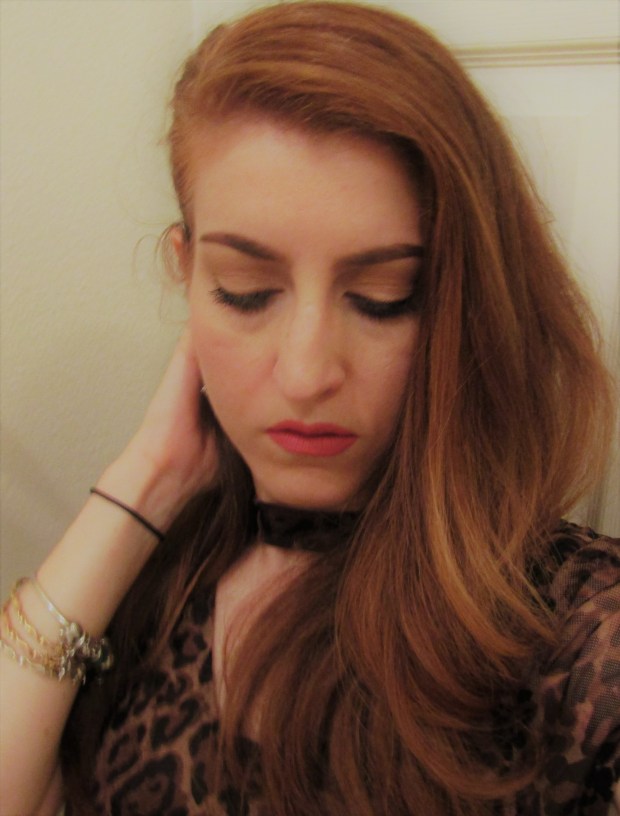
All done! Now you’re ready to take on the day with a chic and fresh look!

makeup

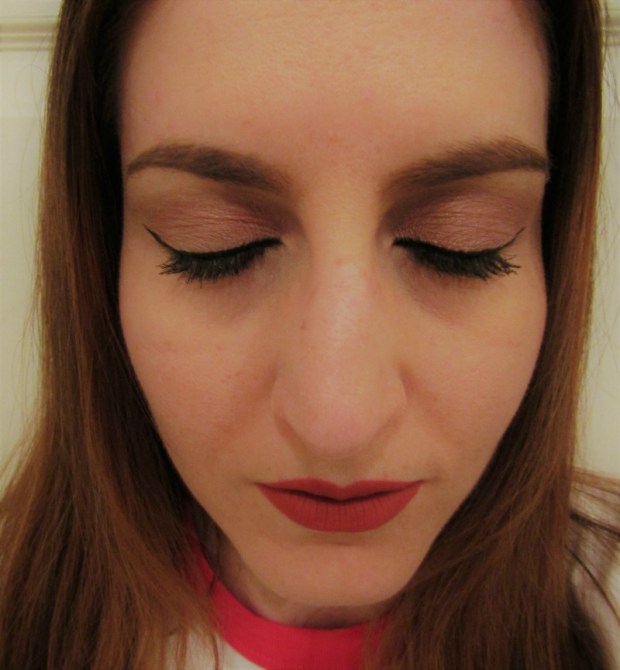
Amount of time to create this look: Approx. 25 mins.

*All products used in this tutorial were bought by the writer.

By: Azzurra Nox