Makeup Look: Autumn Vibes

Fall is in full swing (at least calendar-wise since So-Cal is more cold Spring mode weather wise), but that doesn’t mean that one can’t get into the Autumn spirit anyway! So Pumpkin Spice and all things creepy, makeup looks for fall tend to focus on rich gold and copper colours, and I’m here for that.

For this simple look, I chose to use Colourpop’s Eye Palette Head Capricorn in Charge.

This eye look is very easy to achieve:

Lid: Independent shade all over the lid, then top off with a light tap of Hustle Hard (it’s best to use your finger than a brush for this).

Crease: Use Independent again.

Lower lid: First apply Independent to the lower lash line, pulling the color down. Then use Ambition strictly along the lash line, as a liner.

Brow bone: Use a matte white shadow (I used Lancome’s Daylight).

Waterline: White eyeliner (I used Lancome’s Le Crayon Khol in Blanc).

Mascara: Colourpop Act Natural Mascara in Black

Head Capricorn in Charge Colourpop Palette

You can finish this look with any nude lippie, I’m a huge fan of Maybelline’s Liquid Lipstick in Poet topped off with Glossier’s clear lipgloss! For blush, I’d say go for peachy hues (I actually used a peachy eyeshadow from Lancome as blush).

And there you have it, a simple, glam fall look that takes give or take twenty minutes to complete, leaving you just in enough time in the morning to swing by your favourite coffee shop for the must-have pumpkin spice latte.

DID YOU ENJOY WHAT YOU JUST READ? IF YES, THEN SUBSCRIBE TO THE BLOG, GIVE THE POST A LIKE, OR LEAVE A COMMENT! NEW POSTS ARE UP EVERY TUESDAY & THURSDAY!

Makeup Tutorial: Zombie Prom

IMG_0669

With Halloween right around the corner, it was obvious that I was going to share a makeup tutorial. I recently went to a Zombie Prom this past weekend, so I ended up having to do a zombie makeup for the very first time. For being my first time, I think that I did a decent job (good enough to be somewhat creepy).

It actually was very easy to achieve so read below on how to get this terrifying look!

Base

Since I needed to look dead, I decided not to use any concealer under my eyes, and actually accentuated my dark circles even more so. But I first prepped my skin with Smashbox’s Photofinish Primer before applying Manic Panic’s Dreamtone foundation in Virgin (Whitest White) shade. I set the foundation using LunatiCK Cosmetic Labs High Definition Microfinish Pressed Powder.

Eyes & Lips

For my brows, I used my go-to Medusa’s Makeup Brow Wow Wow. For the lids, I applied Siren Song from Notoriously Morbid all over and applied Urban Decay’s Crave eyeshadow along the crease and along my lower lashes. I then accentuated my dark circles by blending Urban Decay’s Crave and Faint eyeshadows.

To glam things up (and since the event was an 80’s Prom theme) I applied one of Nicka K’s Shimmer Eyeliner in Cyan and then using lash glue applied Medusa’s Makeup Glitter in Mystique all over my lid. I finished up my eye-look with three generous coats of Lancome’s Definicil’s Mascara in Black.

The lips were simple, I applied Jeffree Star’s Velour Liquid Lipstick in I’m Nude to cancel out my real lip colour and make them appear more washed out. I then dabbed some Lime Crime Velvetines in Cement in the center to give a “decayed” look.

Zombie Makeup

For my major “gash” I glued some tissue paper on my cheek using lash glue and then dabbed some of the foundation I used prior to make the paper appear like my skin. I then mixed Urban Decay’s eyeshadows in Crave (a matte black hue) and Faint (a matte brown hue) I dabbed it on the wound. Finally to complete the look I used Blood FX Gel around and on the wound.

Then using only the two Urban Decay eyeshadows (Crave and Faint) I placed random wounds along my face and then using the FX Blood Gel I applied it on top of that and near and around my lips.

Using a liquid eyeliner I then created broken veins along my forehead and down my eyes.

Let me know what you think of this Zombie look and if you’ve created other Zombie looks yourself!

By: Azzurra Nox

Makeup Tutorial: Life is Peachy!

peachy

I’m a huge fan of peach hues when it comes to makeup, but finding the perfect shade of peach can be quite daunting! So when I saw that Colour Pop had a few shades of peach, I jumped right on it and ordered several shades. This look is quite simple, but at the same time very fresh and chic and I could see it being used for a day-time cocktail party or ya know, just glamming it up as you binge-watch American Gods cause ya gotta be one fancy beyotch as you stuff your face with Captain Crunch berries.

Base

As usual I prepped my undereye area with Smashbox’s Photofinish Primer, and although there may be other cool primers out there, I’m really happy with this one, so I’ll usually stick to what I love before I branch out to others. Now, I’ve been looking for a new concealer for months to BLOW ME AWAY, and seeing that Allure lauded Colour Pop’s concealer so much, I knew that I just HAD to try it. So I ended up getting Colour Pop’s No Filter Concealer in Fair 5. Well, let’s say that in photos, the concealer looked amazing, but in real-life not so much (can anyone say, crease-much?). By the end of the day I felt like Steven Tyler and his million wrinkles. Not cool.

I set everything with Makeup Forever’s Ultra HD Pressed Powder in Transluscent and used a pretty peachy hue blush from Clinique called Peach Pop (I believe this was a limited edition).

Using a tiny beauty blender I added some highlights to the tip of my nose, brow bone, and cheeks using L’Oreal’s True Match Lumi Liquid Glow Illuminator Prime & Highlight in C301 Ice Glace.

peacheye

peacheye2

Eyes & Lips

For my brows, these days I’m sticking to Brow Wow Wow from Medusa’s Makeup. I just LOVE this so much, and the angular brush that Medusa’s Makeup sent me with this is absolute brush heaven.

For the lids, I applied Colour Pop’s Super Shock Shadow in Kennedy and placed Colour Pop’s Super Shock Shadow in Bandit in the crease and lower lash line, while applying Wet N’ Wild Creme Brullee eyeshadow along my brow bone. I used Revlon’s Colorstay Liquid Eye Pen in Black to make a simple winged liner. I then applied Clinique’s lash building primer after curling my lashes, and let the primer set for a few seconds before applying a generous amount of Clinique’s High Impact Mascara in Black to both my top and bottom lashes. To brighten up the look I lined my waterline with Lancome’s Khol Crayon in Blanc.

poplips

I finished off the look with Colour Pop’s Kathleen Lights’ collab Ultra Matte Lip in Alyssa. This shade is the perfect pinky nude that you simply need in your life right about M-E-O-W.

Let me know what you think of this look!

losangelesz

By: Azzurra Nox

Gettin’ Rosy Make-Up Look!

IMG_0331

This summer has been particularly warmer than usual, and because of that I haven’t been inclined to wear too much makeup. Hence, my choice to skip eyeliner (gasp!) and go for a fresher look. This look below is more on par with how I used to do my makeup as a teen, but I see that the look is still quite on trend!

Base

I rarely use foundation (unless I have to do a photoshoot where wearing more makeup actually helps with photos coming out better), and even then I tend to use a BB cream rather than a foundation. So, I usually just prep my undereye skin with Smashbox’s Photofinish Primer so that it’ll create a smooth canvas for my concealer (I used Lacome Long-Lasting Undereye Concealer in Ivoire). I set everything with Makeup Forever’s Ultra HD Pressed Powder in Transluscent. For blush, I went with Lancome’s La Rose Blush Poudrer and highlighted my cheeks with Jeffree Star’s Skin Frost in Peach Goddess.

IMG_0318

Eyes & Lips

For the brows, I used Medusa’s Makeup Brow Wow Wow which is A-M-A-Z-I-N-G. This brow kit comes with a powder brow tint and a brow bone highlighter. I then applied Urban Decay’s Harajuku eyshadow on the lid (but any frosty pink shade will do the trick) and applied Urban Decay’s Anaheim eyeshadow in the crease as well as using it as a liner to give my eyes some extra definition (you can choose any taupe shade for this step, but the secret is to not go too dark because you want it to look subtle and seamless). I then applied Lancome’s Le Crayon in Blanc in the waterline to mask any possible redness and make my eyes really pop. I topped the whole eye look off with Benefit’s They’re Real Lengthening Mascara in Black.

IMG_0320

For the lips I decided to go with Jeffree Star’s Velour Liquid Lipstick in Calabasas, which has become my go-to shade this summer because it’s such a pretty shade of pink without it being cheesy or leaning towards the Barbie or bubblegum territory.

IMG_0334

I used 11 products in all (which isn’t too bad) and it took me about 20-25 minutes to apply, so you won’t be spending all day trying to get ready (cause really you’ve got places to go and memories to make!).

Let me know what you think of this look in the comments below!

By: Azzurra Nox


Makeup Muse: Elle Fanning

elle

To shake things up I decided to do my first collab with the awesome Brooke (brookeclarke.com, go check her blog out, it’s seriously tops!). We both agreed to do our take on Elle Fanning’s effortless Cannes 2017 makeup look!

One thing that Elle always has is beautiful skin, so for this look you’re going to want to prep your skin with some hydrating cream and primer. Some of my favourite light day creams are The Body Shop Seaweed Oil Control Day Cream ($20) or Clinique Superdefense Daily Dense Moisturizer Broad Spectrum SPF 20 ($48), these creams are perfect for acne-prone or oily to combination skin types. If you’re more on the dry side, you’re better off choosing a richer cream.

For this look, the focus was on the lips whilst the eyes were almost left bare (almost meaning that they chose natural looking colours rather than something bold). And while the lips were supposed to be the main attraction, the look was softened by a rose/blush hue.

I attempted to recreate the look whilst putting my own spin on it so this is more of an inspiration than exact photocopy.

IMG_0342

IMG_0344

IMG_0345

Products* Used:

Clinique Pep-Start Hydroblur Moisturizer

Urban Decay ABC Gum Eyeshadow (on lid)

Urban Decay Anaheim Eyeshadow (as liner)

Lancome Color Design Eyeshadow in Chic (in crease)

Wet N’ Wild Eyeshadow in Creme Brullee (on brow bone)

Medusa’s Makeup Brow! Wow! Wow!

Urban Decay Star Bronzer Natural Glow

Lancome Le Crayon Khol in Blanc (in waterline)

Soap & Glory One Heck of a Blot Translucent Powder

Lancome Long-Lasting Undereye Concealer in Ivoire

Urban Decay Afterglow Powder Blush in Score

Jeffree Star Cosmetics Skin Frost in Peach Goddess

Jeffree Star Cosmetics Velour Liquid Lipstick in Rosematter

It Superhero Mascara

This is a fairly easy makeup look that can be recreated in 20-mins! Perfect for days when you’re running late or don’t feel like having too many products on your face!

IMG_0348

IMG_0358

*All products used were purchased by writer.

By: Azzurra Nox

Summer Trend: Glitter Pop!

IMG_0298

With the summer months cranking up the heat factor, sometimes wearing layers of makeup may feel downright gross. Not to mention that it’s best to allow our skin to breathe when the temperature rises (meaning not to clog our pores with too much powder or foundation). So how does a gal still manage to look a little glam even when the day is scorching?

One of my fun go-to makeup to amp the colour without having to worry about caking it up and still looking fresh and fun is glitter liner! The key to keeping this look summery is to choose a liner that’s bright in colour, such as teal, cyan, violet, or even magenta! I chose a cyan hue from Nicka K that not only brightens the eye but also gives it a playful look without looking too Vegas showgirl.

You can either make the line thick or thin, I personally chose to keep the line as thin as possible. Another trick is to keep the rest of the eyemakeup simple. I used a neutral gold based eyeshadow (Urban Decay’s Maui Wowie), but you can use any neutral that best suits your skintone.

IMG_0294

What do you think about glitter liners? Do you have a favourite?

By: Azzurra Nox

Violent Violet Make-up Look!

Nowadays, it’s far more common that I’ll be sporting a neutral smokey look when it comes to eye-makeup. But when I was just a teenager, I LOVED bold purple shadows. I think one of the reasons why I stopped doing my eyes that way wasn’t because I didn’t enjoy the purple shadows anymore, but rather because in the coming years it has been difficult to find shades of violet that I actually like and suit me.

But recently I’ve found a violet shadow that I adore, and decided to start sporting the same makeup look I had when I was sixteen to see if I’d still love it today. Well, I probably wouldn’t wear it everyday now, but I do think it’s a pretty option every now and then.

violet3

Products*:

Notoriously Morbid Eyeshadow – Siren Song

Wet N’ Wild Eyeshadow – Creme Brullee

Urban Decay Eyeshadow – Anaheim

Urban Decay Eyeshadow – Romp

Urban Decay Eyeshadow – Blonde

L’Oreal Mascara Primer

L’Oreal Voluminous Mascara in Blackest Black

NYX Eyebrow Marker in Medium

Jeffree Star Liquid Lip Velour in Rose Matter

Urban Decay Glow Blush in Score

Smashbox Full Exposure Mascara in Black

Lancome Le Crayon Khol in Blanc

violet

Step One:

I distributed Notoriously Morbid’s loose shadow in Siren Song all over my lid. I really packed on the colour. Be sure to use an eyeshadow primer as that truly makes the colour POP. Usually I use Urban Decay’s Primer Potion, but I decided to get Wet n’ Wild eyeshadow primer a go and it works just as well at a fraction of the price!

Step Two:

To not overwhelm the purple, it’s best to use a neutral transition colour on the crease. I opted for Urban Decay’s Anaheim shade. I dusted it with a light hand using a blending brush. I then placed Wet N’ Wild’s Creme Brullee shade all over my brow bone and lightly dusted Urban Decay’s Blonde shade on my brow bone to highlight it.

Step Three:

I then used Urban Decay’s Romp shade (a deep purple) as my liner for upper and lower lashes. It’s an eyeshadow, but I often like to use shadows as liner when I’m trying to keep the look light and not product heavy. I then used Lancome’s Le Crayon Khol in Blanc on the inside of my lower lash line.

violet2

Step Four:

After curling my lashes with an eyelash curler, I used L’Oreal’s Primer to coat my lashes. I allowed ten seconds to dry before applying three coats of L’Oreal’s Voluminous Mascara in Blackest Black and one coat of Smashbox’s Full Exposure Mascara to my lower lashes. For my brows I used NYX’s Eyebrow Marker in Medium. This is hands-down the best and most lightweight eyebrow I’ve ever used! So kudos to NYX for making such a kick-ass product that is long-lasting and smudge free!

Step Five:

To complete the look I dusted Urban Decay’s Glow blush in Score and added Jeffree Star’s Liquid Velour Lipstick in Rose Matter to my lips.

lips

Now slip into something edgy and go out to show off your look! Let me know what your fave purple shadows are in the comments below!

*All products used for this look were purchased by the writer.

By: Azzurra Nox

Simple Pin-Up Eye-Makeup!

looking down

The Pin-Up look is nothing new, as it was all the rage during the 1940’s-1950’s as it was popularized by icons such as Marilyn Monroe. In modern times, Dita Von Teese has been the one to bring the look back, and recently Lana Del Rey.

This look can be worn by anyone. It’s universally flattering for any skin type, age, or ethnicity. Not to mention that it’s quite simple once you learn the basics.

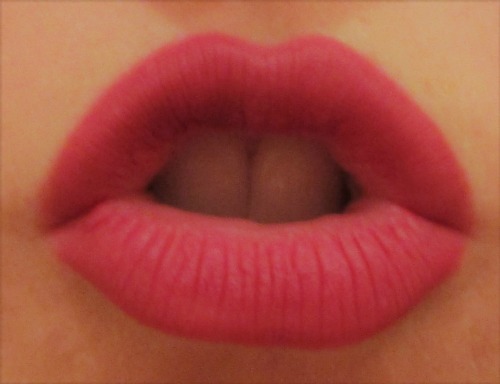
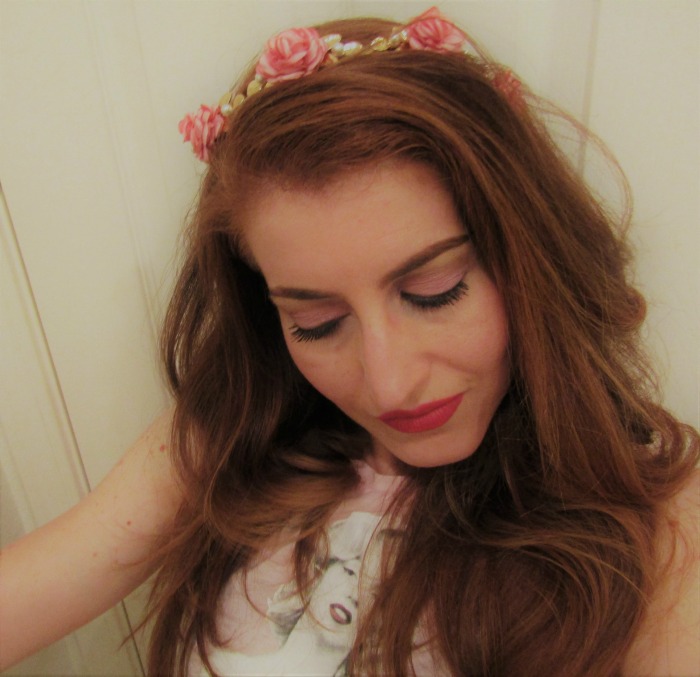
For this tutorial, I didn’t use the signature red lipstick that is best known for complimenting the Pin-Up eye-makeup. Personally, I think that any lip colour can be used with this look, as the eye-makeup isn’t too outrageous. So you can either dress the look up by using a bold red or tone it down by choosing a nude or rose hue instead.

Products*:

Smashbox Photo Finish Foundation Primer

Maybelline Instant Age Rewind Eraser Dark Circles in Light

Soap & Glory One Heck of a Blot Translucent Powder

Urban Decay Eyeshadow Primer Potion Original

Revlon Colorstay Liquid Eye Pen Classic in Blackest Black

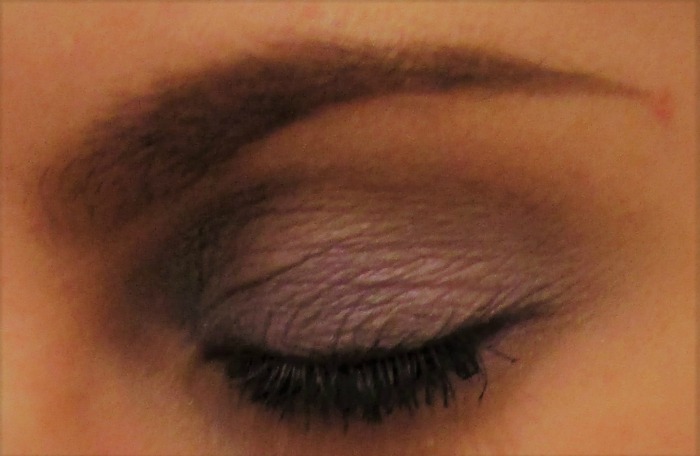
Wet N’ Wild Eyeshadow in Creme Brullee (all over eye area)

Smashbox Eyeshadow in Grounded (in crease)

Smashbox Eyeshadow in Canyon (along lower lash line & brows)

Tart Blush in Paaarty

Hard Candy Eye-Def Metallic Eyeshadow in What Sandy Says Goes

L’Oreal Voluminous Superstar in Blackest Black

Lancome Le Crayon Khol in Blanc

Step One:

Use Smashbox’s Photo Finish Foundation Primer to prep your under-eye area before you use the concealer of your choice (currently I’m in love with Maybelline’s Instant Age Rewind Eraser in Light, as it covers up my dark circles in one easy swoop!). To set the concealer, I patted some of Soap & Glory’s translucent powder under my eyes and over the rest of my face.

Step Two:

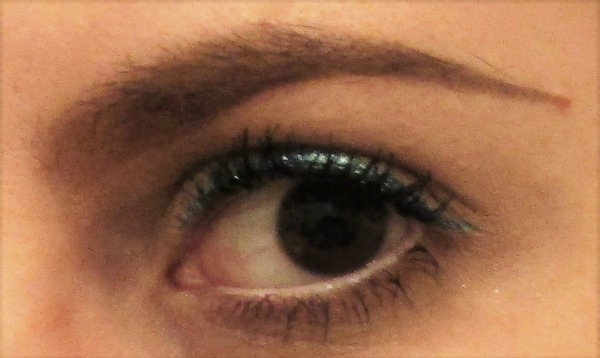
Use a dime size of Urban Decay’s Eyeshadow Primer Potion (or any primer of your choice, to really keep your eye-makeup going for hours without any smudges!). Once you’ve done that, pack a bit of Wet N’ Wild’s eye-shadow in Creme Brullee with a brush and pat all over your lid and up to your brow bone.
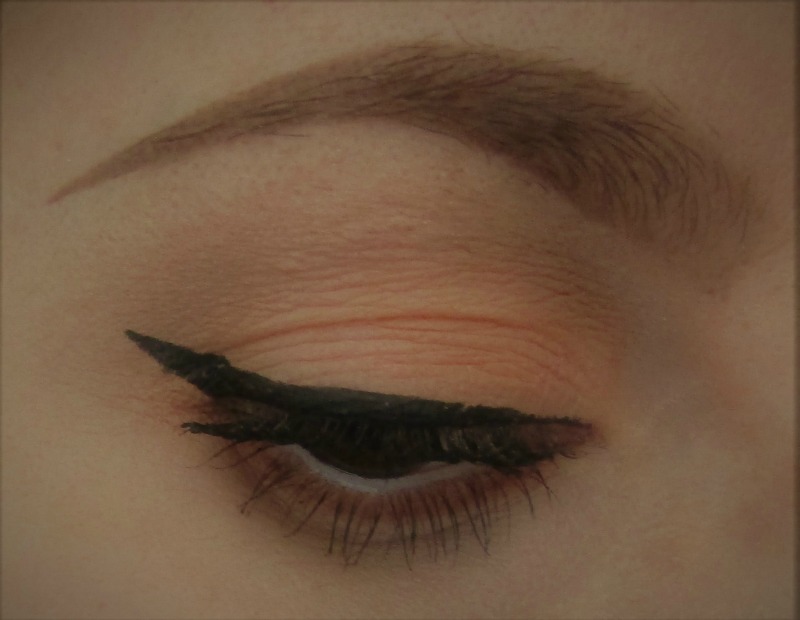
Step Three:

Using a blending brush, place Smashbox’s Eyeshadow in Grounded in the crease, and blend till the shadow is seamless. Take a liner brush, and place a small amount on it and line your lower lashes using Smashbox’s Eyeshadow in Canyon.

Step Four:

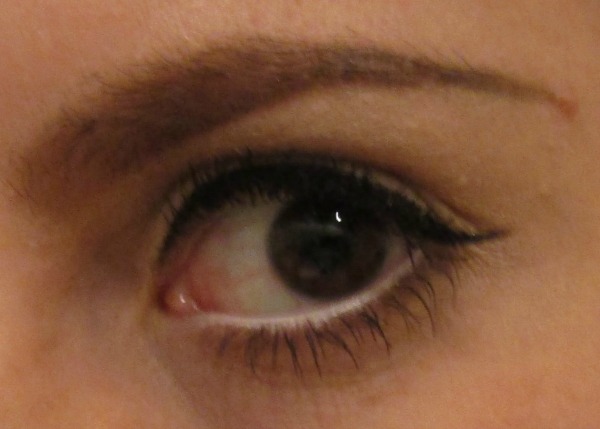
Line your eyes using a liquid liner (I use Revlon’s Colorstay Liquid Eye Pen in Blackest Black). I did a classic cat-eye. You can either make your cat-eye simple as I did, or more dramatic by extending it further up.

Step Five:

To add a bit of a glam edge, I dusted a bit of Hard Candy’s Eye-Def Metallic Eyeshadow in what Sandy Says Goes, only on the lids. You can use any metallic or frosty gold shade.

Step Six:

Using a spooley brush out your eyebrows, and with a liner brush you can make your brows a bit bolder by using a shadow that’s slightly darker than your hair colour. I used Smashbox’s eyeshadow in Canyon. But depending on your hair color, you may choose another colour that best suits you.
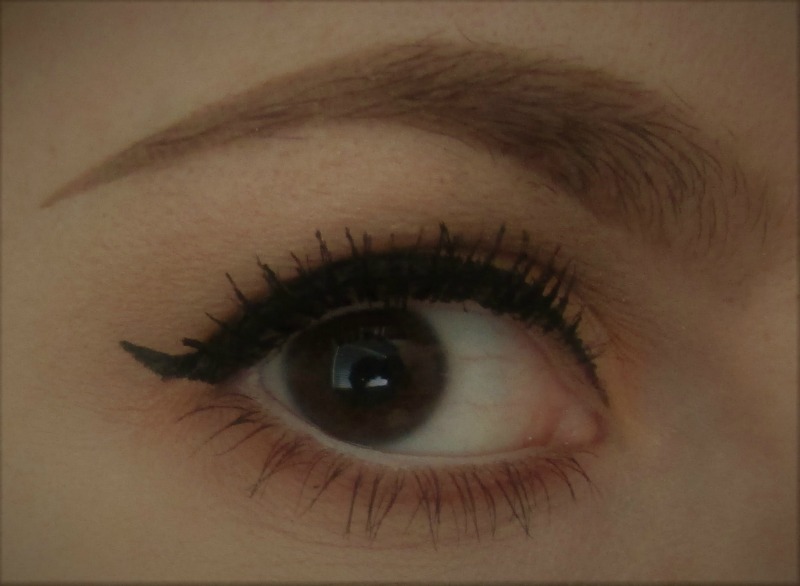
Step Seven:

To make your eyes really pop, line the inside of your eyes with a white eyeliner (I used Lancome’s Le Crayon in Blanc). This trick makes your eyes appear bigger. Finish off the look my curling your lashes with an eyelash curler, and coat your lashes with primer. Wait ten seconds and then use two coats of black mascara. I used L’Oreal’s Voluminous Superstar in Blackest Black mascara, because it comes with a primer on one end, and mascara on the other end. Basically for about $9 you get two products in one! Win-win!

Step Eight:

Add a little colour to your cheeks with the blush of your choice (either a peach or pink hue). I went with Tart’s Blush in Paaarty. It’s simple but not too overwhelming.

glam eye left2

glam eye left open

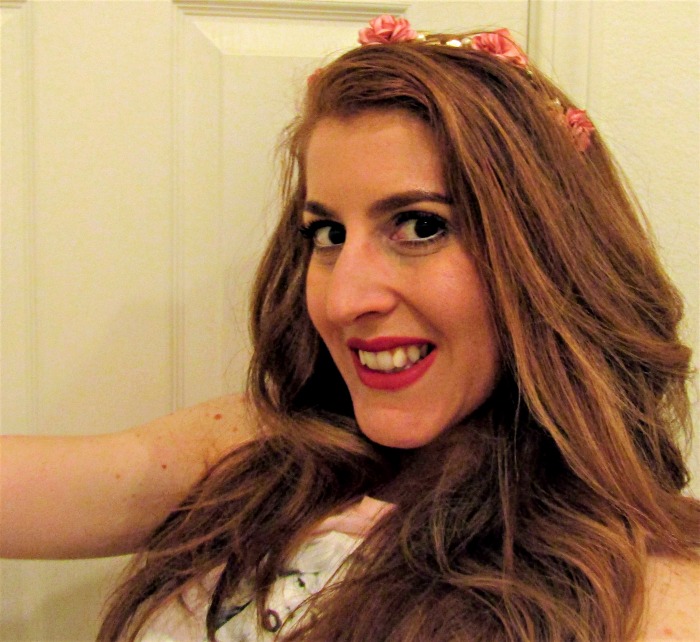
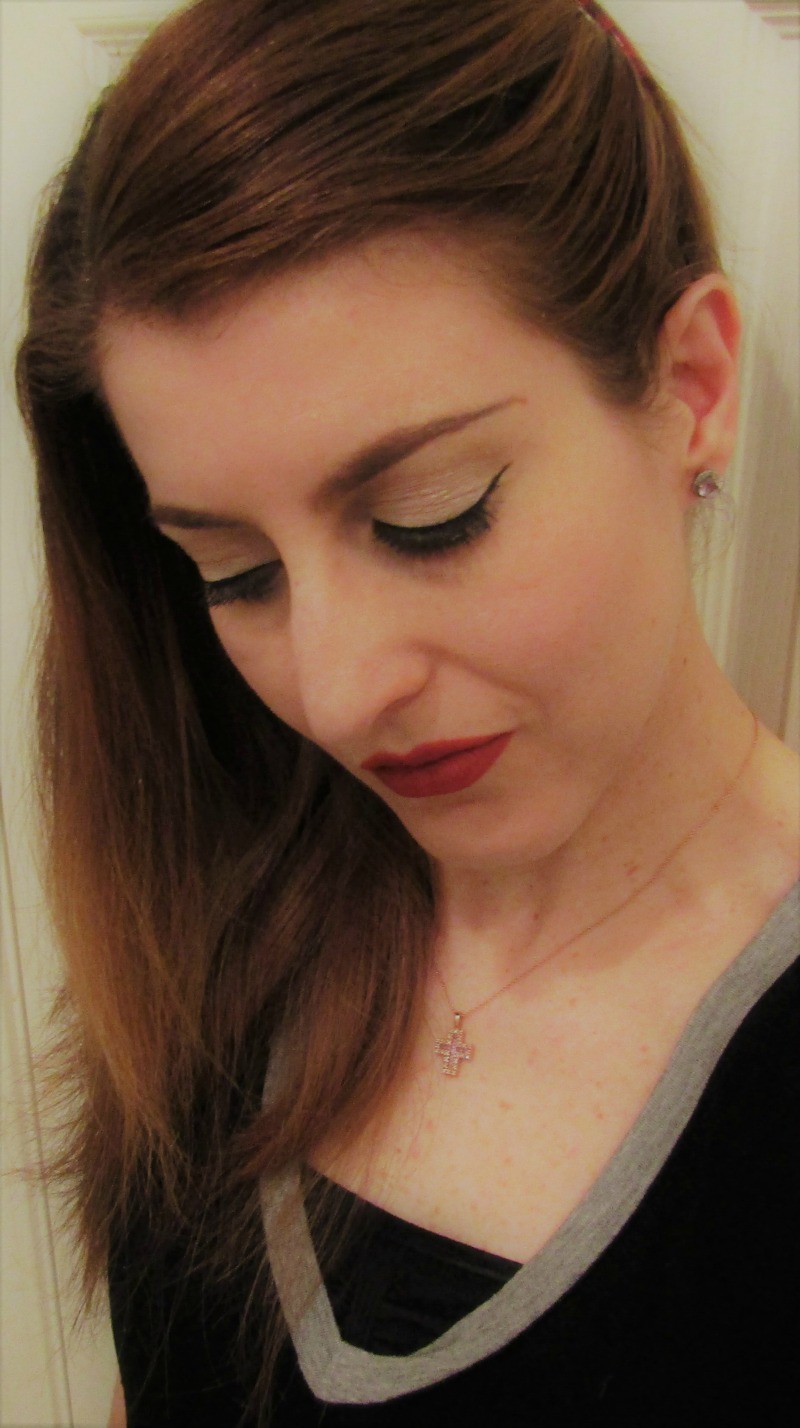
Now go out and show off your look! This can be worn for any occasion or time of day. Simply change your lip shade and you can either turn this look into a day-time look or amp it up for an evening date night look!

smiling

*Products used for this tutorial were purchased by the writer.

By: Azzurra Nox